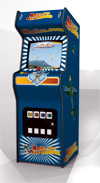


You could have your own Desktop Arcade Machine model in under an hour. Just download and print off our plans on normal printer paper. The model comes in various sizes, and there is a .pdf version and a .jpg version. The .pdf should give you better quality, but it's a bigger download.

There is also a bonus model of a Bar Stool to go with the Arcade Cabinet you can download at the end of this page.
Firstly the mini version which fits on one page of A4 paper and stands about 90mm tall. Click Here for the .pdf version or Click Here for the .jpg. If you want the larger version which stands at about 120mm tall then keep reading.
We have provided a very short 3D animation showing the construction of the mini arcade cabinet. This should give you an idea of how simple it is to construct.
We recommend leaving the top of the cabinet open until the very end as in the video.
This enables you to put your fingers or some other object (we used a ruler) inside the model to press against the 2 folded sides when you attach them.
The larger model is spread over 2 pages of A4. Click here for the larger model .pdf version which includes both pages.
The .jpg version is 2 separate downloads click here to download the page 1 .jpg, and here to download the page 2 .jpg.
If you are happy with your new desktop toy then please send us a photo of it sitting on your desk as we would love to see how they turn out. You can contact us via Twitter or by using this form.
We would like to set up some kind of gallery, so would really appreciate it if you could send us photo's of the model from around the world perhaps near a landmark. We don't get out much ;)
A couple of weeks after we launched this model we thought the cabinet wuld look better sat on our desks with a bar stool to go with it. You can download the .pdf version here (better quality) or the .jpg version here. You get both sizes and 2 different materials from just the one download.
We put together a video of how the stool is constructed. We found that we could make the legs stronger by folding the bottom section of each of the 4 legs (along their length not width). It isn't necessary but thought we would let you know as it's not in the instruction .jpg .pdf or in the video.
